Knowledge is vast!

Yeah its true, knowledge is vast! It should be sought! Because the knowledge are always on progress through the works of creative innovations.

Here I will share about computers, sciences information and many more about what I want to share
I'll share it in two languages, Bahasa Indonesia and (sometimes) English.

So if you like this blog, please follow me or like my fan page.

Thanks.


Hey buddies, welcome here... Get knowledges and share it to your friends around the world, just click share button dude...
Showing posts with label how to. Show all posts

Sunday, September 11, 2011

Download Video Youtube [MUDAH] tanpa Software!

Pernah melihat Video Youtube yang lucu, sedih, atau video dokumenter? Melihat film jadul (jaman dulu) atau video klip dari band favorit? Kadang dari semua aktivitas menonton video online dari youtube, hal yang paling di inginkan adalah memiliki copy an video terseut. Download? yup tentu saja.. sayang untung mendowload kita harus punya software yang harus makan space harddisk. Eitss siapa bilang harus begitu? dengan JavScript pun bisa kok. Tinggal jalankan JS trusjadi deh, dibawah video yang anda tonton udah ada linknya..wkwkwk gimana caranya?? begini:

Pertama, pastikan kamu pake Google Chrome, kenapa? karena GC emang paling ringan..wkwkwk *bukan ituu* tapi karena soal install javaScript google Chrome paling gampang, karena tanpa pluign tambahan seperti firefox.

Masih setia sama firefox?? ya udah sebelum ke langkah selanjutnya install dulu deh plug-in nya :cd

Udah punya GreaseMonkey? (aku kan pengguna Chrome jadi gak usah pake GreaseMonkey segala :cool )
ya udah sekarang tinggal install script-nya dari link ini >> http://userscripts.org/scripts/show/62634

Udah itu aja, sekarang restart browser biar ngepastiin scriptnya jalan.. :cd kalo pake chrome seh gak usah restart :ngakak

Sekarang buka video youtube yang mau di download.. misalnya ini >> http://www.youtube.com/watch?v=G9F0yXS9oDw&feature=topvideos_entertainment

lihat deh bawah video sekarang ada tombol apaan? yup benar download! tinggal pilih quality (kualitas) yang di sediakan Youtube jadi deh ke download tuh Video..

ini screen shootnya gan..
ScreenShot 1 :


ScreenShot 2 :


Tinggal klik aja kan gan :cool O iya gan, :cystg ini cuman berlaku buat vide yang biasa ya gan, bukan masuk ke fanpages, misalnya http://www.youtube.com/googleindonesia maka link downloadnya gak bakal ada :kabur


===== You may here by searching this topic: mendownload video youtube tanpa software, download video youtube, download video tanpa software, video youtube downloader, youtube download, download youtube without software


If you like this post, please leave your comment below to tell me that you're happy with these articles just share this post to your friends... You can follow me on twitter @yusuf_udin to contact me :)

Thursday, August 25, 2011

Membuat 'saving energy' pada Blog atau Website

:hmm: seperti yang kita tau energi kini sudah merupakan barang yang harus benar-benar dijaga.. Para ilmuwan  pun sekarang sudah mulai mencari energi terbarukan. Ya! memang merupakan fakta tak terbantahkan jika energi dunia semakin krisis. Disamping itu dari segi teknologi, para pembuat gadget pun juga mulai mencari solusi untuk membuat gadget yang low-energy. Misal dalam komputer, penggunaan komputer dan laptop yang semakin hari semakin tak terkonkrol saja :hammer juga ikut menghabiskan banyak sumber energi.

Dan kita tahu bahwa dengan membuang-buang energi (termasuk listrik) ikut berperan andil dalam percepatan GLOBAL WARMING :mewek

UNTUK ITU AYO KITA BERHEMAT-HEMAT ENERGI
UNTUK MASA DEPAN ANAK CUCU KITA YANG LEBIH BAIK!

Kalau kita punya blog, kita bisa membuat blog kita lebih ramah energi. Yaitu dengan menampilkan halaman berwarna hitam ketika seseorang pengunjung meninggalkan blog kita dalam waktu satu menit. Jadi inilah intinya, kita tahu layar yang berwarna hitam sama dengan tidak memerlukan energi! :toast .

Andai semua web seperti ini, mungkin akan lebih efektif ya.... :cool

Sekarang gimana caranya?
Nah dengan script dari http://www.onlineleaf.com/ berikut kamu bisa membuat blog kamu menampilkan halaman kosong jika pengunjung mendiamkannya selama 1 menit.

Caranya:
Untuk blogger:
masuk ke "Rancangan" atau jika menggunakan bahasa inggris namanya "Design". Pilih "Edit HTML"
lalu cari kode <head>  menggunakan fasilitas CTRL+F dan ketikkan kode berikut dibawah kode <head> tersebut:

<script language="javascript" type="text/javascript" src="http://www.onlineleaf.com/savetheenvironment.js"></script>

Setelah itu klik save.

Untuk wordpress, bisa mendownload plugin dari sini.

Karena script ini menggunakan jQuery, maka jika kamu menggunakan javaScript libraries yang lain, tambahkan script 

<script>jQuery.noConflict();</script>

agar tidak terjadi error.

Tuesday, August 23, 2011

Getting Missing Data

Have you ever accidentally lose data? And it is Important Data? If so, maybe when we lose these data you will feel angry and annoyed. Do you know if the data is actually what you get back to you shortly after you remove it from the recycle bin even though you have turned off the computer and then back on again.

Recuva Logo
With a software called Recuva, you can restore the lost data or in another sense you will get your old data. Of course all this is not unconditional, you must understand that before you do this trick, you get the data you want is not that long ago deleted. You should also know that you have never done the 'drive wiper' after deleting the dat. And remember also that you do not remove the data by cleaning software such as CCleaner or through a secure data deletion process.

Well, back to the topic of discussion, Recuva is free software made ​​by Piriform (CCleaner, which also produces software). Although free, but Recuva has a feature that is qualified. With Recuva you can mengembailkan dat is erased during the data is not overwritten by other data. Even data that has been long removed any terkadan can be recalled in the search results to data Recuva yag deleted. And to prove it, you can download directly from its official website Recuva in http://www.piriform.com/recuva/download or directly from here:


Monday, August 22, 2011

[How To] Make an Own Website at NO COST! - Free of Charge (Part III)

In this third part I will show how to register a free domain dot.tk to you, at the same time connecting to a web hosting account.


 1. First, go to http://dot.tk and enter the domain name that you submitted in 000webhost earlier (or if already registered simply log only) as an example, here I register a domain Eleven-elephants.tk. simply by typing its domain name, eg here: Eleven-elephants. Then click "GO"


insert "domain name server details"

2. Then select the "Use DNS" and select tabs "Your own DNS". Enter a domain name server that is in 000webhost before.


You can get "domain name server" from your Account details on 000webhost


3. Complete all the forms that are required. Then register yourself. You can sign up through a Facebook account, Google, Windows Live ID, Yahoo, AOL or Flickr if you want. But if you do not want menguhubungkan one of the accounts mentioned above to dot.tk then choose "use your email address for signup".


4. Done. If there has already been notified that your domain has been created, then you just waiting for the two accounts are connected (domain dot.tk to 000webhost). Results if your site is ready to be used is like the next image:


Final words:
If you are planning to register a co.cc domain, then the steps are performed more or less the same. At essence in making a website is that we must have a domain and hosting then connect it. Then you upload the data needed webiste, for example main page or all pages to be published to the public. Then you have to do to make your webiste look attractive is to manage your website.


If you like this post, please leave your comment below to tell me that you're happy with these articles..
just share this post to your friends..


You can follow me on twitter @yusuf_udin to contact me :)


Thanks...


[How To] Make an Own Website at NO COST! - Free of Charge (Part II)


In this second article I will discuss how to sign up for a webhosting. Of course that is in use is webhosting free webhosting. 000webhost I use as examples in this article.Actually a lot of hosting services that provide free services, but I just chose 000webhsotas an example because I think 000webhost is very simple.


Previously, if you want to know what is web hosting you can visit the following address: http://en.wikipedia.org/wiki/Web_hosting
A web hosting service is a type of Internet hosting service that allows individuals and organizations to make their own website accessible via the World Wide Web. Web hosts are companies that provide space on a server they own or lease for use by their clients as well as providing Internet connectivity, typically in a data center. Web hosts can also provide data center space and connectivity to the Internet for servers they do not own to be located in their data center, called colocation or Housing as it is commonly called in Latin America or France..
The scope of web hosting services varies greatly. The most basic is web page and small-scale file hosting, where files can be uploaded via File Transfer Protocol (FTP) or a Web interface. The files are usually delivered to the Web "as is" or with little processing. Many Internet service providers (ISPs) offer this service free to their subscribers. People can also obtain Web page hosting from other, alternative service providers. Personal web site hosting is typically free, advertisement-sponsored, or inexpensive. Business web site hosting often has a higher expense.
Single page hosting is generally sufficient only for personal web pages. A complex site calls for a more comprehensive package that provides databasesupport and application development platforms (e.g. PHP, Java, Ruby on Rails, ColdFusion, and ASP.NET). These facilities allow the customers to write or install scripts for applications like forums and content management. For e-commerce, SSL is also highly recommended.
The host may also provide an interface or control panel for managing the Web server and installing scripts as well as other modules and service applications like e-mail. Some hosts specialize in certain software or services (e.g. e-commerce). They are commonly used by larger companies to outsource network infrastructure to a hosting company.


Well here are the steps in registering to 000webhost.com:


SignUp
    1. Register your website hosting here http://www.000webhost.com/order.php. If you do not already have your own domain (since you also are not signed up dot.tk) then please use with a subdomain provided by 000webhost (only for the first time only)


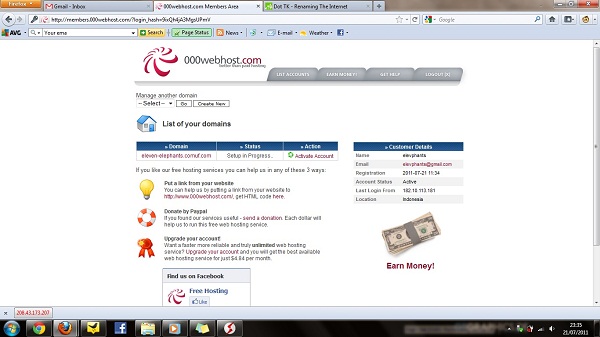
    2. After the first list, you need to confirm your email. Simply click on an account that was in the list then click the confirm email and check your email. completed. So on the second day you can register your domain name to these hosting. The following are the screenshots for step by step instructions to make it more clear:


    Progress notification. Click your Domain name to go to your account details (for the first time you need to confirm via email)


      Click Confirm my email button to confirm your email


      Now check your email and click the link that they're provide to you


      Now register your new domain to 000Webhost, enter the domain name (yourname.tk or yourname.co.cc) that you have registered then choose the password that you want to this account.

      Ok now you're success to register your domain name to 000webhost. The next steps you must to do is linking your domain to this account, so your data on this hosting is visible to public.

      Go to Cpanel and see "View Account Details"

      In there you can find your account details that you can use for manage your  website data (on this hosting).

      Ok, now you are successful have your hosting account. Then you have to immediately connect your domain to the hosting of this order can be accessed by the public. Two name servers and IP address will be given to you through the "account details". This data can be used to connect the domain that you register before the 000webhost. For example here I use a free domain dot.tk. So I need to do is to go to dot.tk to connect my account.


      If you like this post, please leave your comment below to tell me that you're happy with these articles..
      just share this post to your friends..


      You can follow me on twitter @yusuf_udin to contact me :)


      Thanks...

      [How To] Make an Own Website at NO COST! - Free of Charge (Part I)


      The development of the internet is quite fast, especially since the introduction of the WWW (World Wide Web) by Tim Berners-Lee in 1990. Well now I will share one partof much of the development of the Internet. That is create a website.

      For some people, web blog or often referred to as a blog alone is sufficient to accommodate the aspirations or their paper. But, if you want to have a customizable page, and editfreely throughout the paper and / or web pages that you have of course you want a website with a TOP LEVEL DOMAIN rather than blog with a subdomain.

      Here are the steps which I will describe to make a FREE website with a URL address yorname.tk and certainly with a a lot of free hosting offered by hosting providers overseas.

      1. Register your domain
          What is a domain? Domain is the name of your website. Each web page must have an address different from one another. Domains that we know as yourname.com oryourname.net and others such as the current is actually a measures to facilitate usersto access the server without having to remember series of numbers called Internet Protocol address. To find out more about what domain it please to the following address: http://en.wikipedia.org/wiki/Domain_name

      A domain name is an identification label that defines a realm of administrative autonomy, authority, or control in the Internet. Domain names are hostnames that identify Internet Protocol (IP) resources such asweb sites. Domain names are formed by the rules and procedures of the Domain Name System (DNS). 
      Domain names are used in various networking contexts and application-specific naming and addressing purposes. They are organized in subordinate levels (subdomains) of the DNS root domain, which is nameless. The first-level set of domain names are the top-level domains (TLDs), including the generic top-level domains (gTLDs), such as the prominent domains com, net and org, and the country code top-level domains (ccTLDs). Below these top-level domains in the DNS hierarchy are the second-level and third-level domain names that are typically open for reservation by end-users that wish to connect local area networks to the Internet, create other publicly accessible Internet resources or run web sites. The registration of these domain names is usually administered by domain name registrars who sell their services to the public.

      Individual Internet host computers use domain names as host identifiers, or hostnames.
       Hostnames are the leaf labels in the domain name system usually without further subordinate domain name space. Hostnames appear as a component in Uniform Resource Locators (URLs) for Internet resources such as web sites(e.g., en.wikipedia.org).
       Domain names are also used as simple identification labels to indicate ownership or control of a resource. Such examples are the realm identifiers used in the Session Initiation Protocol (SIP), the DomainKeys used to verify DNS domains in e-mail systems, and in many other Uniform Resource Identifiers(URIs). 
      An important purpose of domain names is to provide easily recognizable and memorizable names to numerically addressed Internet resources. This abstraction allows any resource (e.g., website) to be moved to a different physical location in the address topology of the network, globally or locally in an intranet. Such a move usually requires changing the IP address of a resource and the corresponding translation of this IP address to and from its domain name.

      Domain names are often referred to simply as domains and domain name registrants are frequently referred to as domain owners, although domain name registration with a registrar does not confer any legal ownership of the domain name, only an exclusive right of use.
      The Internet Corporation for Assigned Names and Numbers (ICANN) manages the top-level development and architecture of the Internet domain name space. It authorizes domain name registrars, through which domain names may be registered and reassigned. The use of domain names in commerce may subject strings in them to trademark law. In 2010, the number of active domains reached 196 million.[1]

      There are two options for the free domain you can get, that is:

      1. dot.tk
       dot.tk is a free domain name service that can be used freely with a hosting you want. Registration for each domain valid for a maximum of one year and you can extend for another one next year.

      2. co.cc

      co.cc is quite popular and has a name that can be said to be equal with the .com domain. However, a co.cc domain that can be obtained free of charge to home users. If youwant to use it as a domain for business, then you should buy it.

      For the procedure of registering a domain, I will discuss in the third article, before registering domain i will show you how to sign up to the free webhost.


      If you like this post,
      please leave your comment below to
      tell me that you're happy with these articles
      just share this post to your friends...


      You can follow me on twitter @yusuf_udin to contact me :)


      Thanks...

      Monday, August 8, 2011

      How To Get Old Facebook Chat Style Back (Facebook Sidebar Chat Reversion)

      Facebook recently changed the display of chatting bar into sidebar view and because of that I -- you probably as well don't like to its new design. But don't worry or despair and never search any idea to get back its chatting bar to old view.

      Using these script, you'll get an old view of facebook chat. This scripts is written in javascript language. But, it is not make any changes of your facebook account. So, if you're opening your facebook account in another PC's without this script, you'll be back to the new sidebar view design. Ok, lets we make it old now:
      The first thing you must to do is ensure that now you're using Google Chrome Browser or Mozilla Firefox browser (i'm not guarantee for another browser).

      The second (for Google Chrome user, skip these step and jump to the 3rd step), you must download and install GreaseMonkey plugin (for firefox only) following these link:  
      https://addons.mozilla.org/en-US/firefox/addon/greasemonkey/ 


      after you install it on your firefox, now you need to restart your browser to make it run effectively (although without restarting browser is doesn't matter).

      Now, the third --the most part of this tutorial for making old facebook chat bar: INSTALL THE SCRIPT! 
      You can download the script at these link: http://userscripts.org/scripts/show/107159


      just click install button in top right of that page, then you must restart your browser again (once more, I recommend you to restart after installing any changes to ensure that is installed properly).

      for mozilla firefox


      for Google Chrome


      Now, open your Facebook account like usual you do with your Facebook account.
      LOOK! Your chatting sidebar is back to old view.


      =========================================================================

      If you like this post, please leave your comment below to tell me that you're happy with these articles or these tips and/or just share this post to your friends..

      You can follow me on twitter @yusuf_udin to contact me :)

      Thanks...

      Sunday, August 7, 2011

      Membuat Bootable USB Disk / PENDRIVE untuk Installasi Windows 7

      Membuat Bootable USB Disk / PENDRIVE untuk Installasi Windows 7
      (Making Bootable USB Disk for Windows 7 Installation)


      Bagaimana membuat USB Disk atau biasa disebut flashdisk atau PENDRIVE menjadi pengganti DVD Installer untuk Windows 7??? Awalnya saya tidak begitu mempertimbangkan hal ini, thoh kebanyakan laptop atau notebook jaman sekarang sudah mendukung DVD Drive yang cukup mumpuni. Kalaupun harus mempunyai netbook, thoh pasti sudah berisikan Operating System tertentu –yang kebanyakan sekarang adalah Windows 7 Starter Edition.

      Namun, saya pikir pasti suatu saat menginstall Windows 7 melalui flashdisk tetap dibutuhkan. Untuk kasus-kasus tertentu, seperti ingin menginstall ulang Windows di netbook karena habis kena virus *amit2, moga kagak ane yang kena* atau ingin membawa sebuah installer kemanapun Anda pergi.

      Ok, tak usah berpanjang lebar kali panjang kali tinggi *volume doong??? Kkkkk~*, saya jelaskan saja langsung prosesnya. Tapi, eittss tunggu dulu bagi yang belum tahu kali ini saya mau ngapain, ok saya jelaskan sebentar yah *yang udah ngerti tetep jangan sombong!!*. kali ini saya akan menjelaskan bagaimana membuat sebuah bootable USB Disk, yaitu kita bisa menginstall Windows 7 dari flashdisk kita. Intinya, kita akan membuat flashdisk kita sebagai pengganti keping DVD Windows 7 untuk instalasi. Cara yang akan saya berikan ialah dengan memanfaatkan Command Prompt yang ada disetiap Windows kita. (anggap saja scenario yang saya berikan ini adalah membuat bootable USB disk untuk menginstall Windows 7 dari Windows Vista; atau dari Windows 7 untuk membuat installer Windows 7 juga).

      Berikut langkah-langkahnya:
      Siapkan:
      ü  USB Flashdisk minimal 3GB
      ü  File Windows (bisa dalam format *.iso ataupun DVD Installernya)

      1.       Buka Command Prompt, caranya pilih Start menu >> All programs >> Accesoriess >> Command Prompt kemudian klik kanan dan pilih “Run as administrator
      2.       Tulis perintah ‘diskpart’ (tanpa single quote) kemudian tekan ENTER, maka akan segera muncul jendela baru yang tampilannya sama dengan Command Prompt.
      3.       Di jendela baru tersebut,

      a.       ketikkan perintah
       ‘list disk’ (tanpa single quote) dan tekan ENTER.
       Setelah itu akan tertampil seluruh disk yang ada di komputermu. Saya berasumsi bahwa harddisk internal kamu adalah Disk 0 dan flashdisk kamu adalah Disk 1.
      b.      Bersihkan flashdisk kamu dengan mengetikkan perintah berikut (jika flashdisk anda tidak berada di Disk 1, silahkan ganti angka 1 dengan urutan angka dimana flashdiskmu berada).
      Ketik:
      select disk 1’ (tanpa single quote) kemudian tekan ENTER.
      clean’ (tanpa single quote) kemudian tekan ENTER
      (sebelum melakukan ini, silahkan tutup Windows Explorer dan jangan ada file yang dijalankan dari flashdisk kamu).
      c.       Buat partisi primer untuk flashdisk kamu, dengan menuliskan perintah
      create partition primary’ (tanpa single quote) lalu tekan ENTER.
      d.      Pilih partisi yang telah dibuat dan mengaktifkannya dengan menulisk perintah
      select partition 1’ (tanpa single quote), lalu ENTER
      active’ (tanpa single quote), dan ENTER
      e.      Format flashdisk dan menggantinya dengan filesistem NTFS, caranya ketik
      format fs=NTFS’ (tanpa single quote), lalu tekan ENTER
      f.        Keluar dari jendela sekarang ini dengan menuliskan
      assign’ (tanpa single quote), lalu ENTER
      exit’ (tanpa single quote), lalu ENTER. Sampai disini jendela akan tertutup otomatis.

      4.       Langkah selanjutnya adalah membuat USB Disk menjadi bootable dengan menggunakan file bootsect (didalam folder \boot)yang ada dalam DVD Windows 7 atau Windows Vista atau jika kamu mendownloadnya dari internet yang berekstensi .iso, ekstraklah dulu agar semua file terbuka. Disini saya berasumsi bahwa kamu menggunakan DVD Installer yang telah siap digunakan.
      a.       Masukkan DVD Installer kedalam drive. Buka Command Prompt yang ada pada langkah 1 atau buka kembali jika kamu sudah menutupnya (tidak oerlu mengulangi dari awal). Kemudian ketikkan perintah ‘D:’ (tanpa single quote) untuk membuka DVD Installer tersebut. **masing-masing computer berbeda dalam menempatka nama drive untuk CD/DVD. Disini saya berasumsi bahwa drive tempat DVD berada adalah pada drive D:
      b.      Ketikkan ‘cd D:\boot’ (tanpa single quote). **perintah ‘cd’ digunakan untuk membuka folder. Jika letak folder  adalah di D:\Windows7\boot , maka cukup ketikkan ‘cd D:\Windows7\boot’. Begitu juga bila berada didalam drive dan/atau folder lainnya.**
      c.       Ok, sekarang kamu sudah berada didalam folder D: \boot dimana didalam folder \boot sebuah file bernama bootsect ditempatkan. Sekarang tinggal mengubah sedikit file bootsect tersebut untuk membuat USB Disk menjadi bootable. Ketik:
      bootsect /nt60 H:’ (tanpa single quote), lalu ENTER
                      H: adalah nama drive dari USB yang ingin kamu buat menjadi bootable. Disini saya mengasumsikan USB kamu ada di drive H:. Jika bukan flashdisk kamu bukan di H: , ganti H: sesuai nama flash drive di PC mu.
      5.       Langkah terakhir dari sekian proses panjang adalah, copy seluruh file Windows tadi (di asumsikan ada pada DVD Installer) ke flashdisk mu. Cukup gunakan Windows Explorer dan copy-paste secara biasa. Dan kini USB Disk/flashdisk/PENDRIVE punyamu sudah bisa menjadi bootable untuk menginstall Windows!
      6.       Cek apakah flashdiskmu benar-benar bootable dengan masuk ke BIOS dan mengubah posisi flashdiskmu di priooritas utama booting. **Untuk beberapa laptop hal ini tidak diperlukan.**

      -SELESAI-

      ========================================================================

      biasakan tinggalkan komentar agar memotivasi saya untuk bisa menulis artikel yang lebih baik lagi.. setiap kata yang anda tinggalakan akan menjadi masukan buat saya.. hhee..

      anda boleh mengcopy isi artikel ini dengan syarat hanya sebagian saja, selebihnya harus iarahkan ke blog/link tulisan kesini..hhee..

      Thursday, February 24, 2011

      MEMBUAT FONT PRIBADI DARI TULISAN TANGAN ANDA! (Cara Gampang vs Ribet)

      MEMBUAT FONT PRIBADI: DARI TULISAN TANGAN ANDA! (Cara Gampang vs Ribet)


      Anda yang ingin meiliki computer yang benar-benar “gue banget” (lebey) pasti juga menginginkan agar computer meiliki ciri-ciri atau setidaknya sesuatu yang menunjukkan siapa Anda. Salah satu contohnya ialah meng-kostumisasi font yang ada di Microsoft Word atau font-font di program lainnya dengan tulisan tangan Anda sendiri.
      Ok! Lets do it!
      Sebenernya kita bisa membuat font pribadi -dari tulisan tangan kita sendiri- dengan dua cara yaitu MUDAH dan AGAK RIBET! (kontradiksi banget). Dan daripada saya menjelaskan panjang lebar, silahkan baca selanjutnya…

      Pertama, cara MUDAH!
      Hha, saya kasih tau yang cara mudahnya dulu ya, karena saya tau nanti Anda mau tidak mau pasti pakai cara yang agak ribet jika Anda memiliki dana terbatas.
      Ok,,hal pertama yang harus kita siapkan tentunya adalah seperangkat computer atau laptop –spesifikasi sih sesuai kebutuhan- dan tentunya scanner, printer (scanner+printer yg jadi satu juga gpp, hhe) dan koneksi internet. O iya jangan lupa rekeningnya dan/atau account PayPal nya (waduhh --a).
      Caranya:
      1. buka alamat web http://www.yourfonts.com/
      2. download template yang sudah disediakan. Atau klik disini…
      3. Print template/kertas/document yang sudah didwonload tadi. O iya, pastiin nge-printnya sesuai ukuran kertasnya ya, missal letter atau A4
      4. kamu akan mendapati sebuah kertas dengan tabel yang bertuliskan huruf, simbol dan angka diatasnya. Nah kamu cukup tuliskan tulisanmu –coretan tanganmu- ke kertas tersebut sesuai keterangan diatasnya dan sesuai aturan seperti gambar ini (karakter seperti À, Á, dan Ő yang ada di halaman 2 tidak perlu ditulis jika Anda tidak pernah menulis demikian):

      Keterangan:
      Jadi pastiin kamu nulisnya dari garis baseline sebagai garis utama. Dan untuk tulisan capital, kamu hanya di ijinkan menulis sampai batas garis atas yang disebut cap height. bila kamu nulis huruf kecil disarankan sampai x-height saja. Sedangkan garis batas descender hanya untuk huruf yang punya “buntut”. Penulisan yang tidak sesuai aturan akan menyebabkan font yang dibuat bisa tidak lengkap karena tidak ter-scan oleh computer server
      5. sampai dilangkah ini, yang kamu butuhkan adalah scanner. Scan kertas yang sudah di print tadi dan pastikan pengaturan scannernya bener yaitu minimal 300dpi. Yang penting tulisan kamu masih bisa dibaca dengan jelas. Dan pastikan hasil scan kamu berformat *.jpg atau format gambar lain yang mendukung (lihat situs yourfonts.com)
      6. upload file hasil scan tadi ke http://www.yourfonts.com/ dan lihat preview hasilnya.
      7. jika kamu sudah puas kamu tinggal download dan tentunya bayar dulu , lalu kamu akan mendapatkan file berekstensi *.ttf yang merupakan format font kamu. Dan tinggal install di computer kamu atau jika masih pake WindowsXP kamu bisa copy-paste ke %windir%/Fonts
      8. selesai dan cobalah hasilnya di Ms. Word atau aplikasi yang memerlukan Font lainnya.

      Kedua, cara AGAK RIBET!
      Cara yang kedua ialah menggunakan sebuah software yang sebenenya juga bayar. Tapi kebetulan saya menemukan orang lain men-share-nya secara full version, jadi kamu bisa download disini. Cara ini bisa saja dianggap mudah jika kamu menguasai interface programnya. Karena program yang dipake juga menggunakan prinsip WYSIWYG (What You See Is What You Get). Dan lagi2, daripada memperlama waktu Anda –mengingat waktu sangatlah berharga- sekarng liat caranya.

      Sesuatu yang dibutuhkan masih samaseperti yang diatas yaitu computer/laptop, scanner+printer, dan satu lagi software ialah Font Creator dan Adobe Photoshop.
      1. download template seperti yang diatas dari situs yang sama seperti diatas atau cukup dari sini. (mengingat dibutuhkan sebuah template dan daripada kita susah payah membuatnya maka kita gunakan saja template yang sudah jadi)
      2. Print tulis coretan Anda sesuai keterangan huruf, symbol dan angka (karakter seperti À, Á, dan Ő yang ada di halaman 2 tidak perlu ditulis jika Anda tidak pernah menulis demikian).
      3. Scan tulisan tadi. Intinya langkah 1-3 ini sama seperti langkah 1-5 dari cara yang sebelumnya.
      4. sampai disini, download program Fonts Creator 5.6 dari sini… (cari di postingan sebelumnya juga ada), install dan jalankan.
      5. beralih sejenak dari software Fonts Creator, kita buka software peng-edit gambar dalam contoh disini ialah Adobe Photoshop untuk sedikit meng-edit hasil tulisan yang telah di scan tadi. Cara mengeditnya adalah dengan memotong/meng-crop setiap kotak berisi tulisan kita dan menyimpannya kedalam satu file sendiri. Misalnya untuk huruf “A” kita buat dengan nama file A.jpg dan “a” dengan nama file a_kcl.jpg, begitu pula dengan huruf lainnya.
      Teknik agar kita bisa memaksimalkan waktu ialah bukan menggunakan fitur Crop tappi menggunakan fitur Slice. dimana tujuan dari slice ini ialah memotong gambar kedalam beberapa bagian agar lbih cepat jika gmabar tersebut di tampilkan secara online. Tapi kali ini kita memanfaatkannya secara offline saja.
      Caranya ialah cukup meng-klik slice dan hanya memilih tulisan tangan kita yang di scan tadi. Lalu save as… dg format *.jpg <lebih lengkap lihat videonya karena saya sedang berada dalam konteks membuat font, bukan meng-edit gambar).
      6. kemudian, gambar potongan yang sudah jadi tadi kita masukkan ke setiap kolom di Font Creator, caranya
      a. buka Font Creator 5.6 dan pilih File >> New , beri nama font kamu (nama ini akan digunakan saat kita searching di menu font di aplikasi semisal Ms. Word)
      b. klik ganda kotak yang ingin kita masukkan karakternya, contoh kotak “A”.
      c. klik kanan lalu pilih Import image , pilih Load… dan cari gambar tulisan “A” yang tadi kita sepakati telah diberi nama file “A.jpg”. klik Open lalu klik Generate
      d. jika gambar tulisan tangan Anda terlalu besar/ terlalu kecil Anda bisa mengaturnya dengan menggunakan mouse. Dan pastikan batas bawah atau garis normal dari fonts anda ada di garis yang disebut “Baseline” dan untuk karakter capital anda di batasi sampai “WinHeight” sedangkan “x-height” untuk karakter kecil dan “WinDescent” adalah batas bawah dari karakter yang emiliki buntut missal “f” dan “g”.
      e. ulangi langkah 6 a-d sampai –paling tidak- semua karakter utama yaitu A-Z dan 0-9 terisi semua.
      f. test font anda dengan menu Font >> Test atau klik F5
      7. jika sudah selesai semuanya tinggal save. Caranya klik File >> Save as… beri nama font kamu. Save
      8. install font tadi dengan klik ganda untuk Windows 7 atau copy paste ke %windir%/Fonts di computer/laptop kamu.
      9. selesai
      nah untuk download programnya klik disini...
      Download

      kurang jelas?
      coba lihat video berikut:

      [youtube=http://www.youtube.com/watch?v=i6l5poy5GJo&w=480&h=390]

      <>


      Twitter Delicious Facebook Digg Stumbleupon Favorites More

       
      Get widget